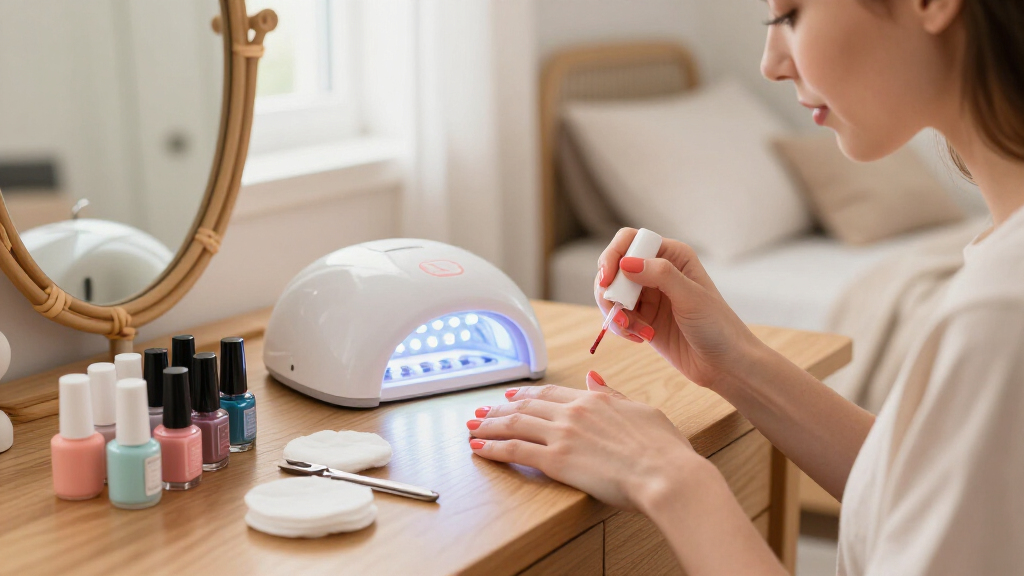
This guide walks you through applying a UV gel nail polish set — base coat, color polish, and top coat — and curing each layer under a UV or LED lamp. Done correctly, a gel manicure lasts two to three weeks without chipping and dries completely under the lamp, so you can use your hands immediately after finishing without smudging. This guide is written for beginners applying gel polish to natural nails at home for the first time. No salon experience is required. Plan on 45 to 60 minutes for a full set of ten nails; your first attempt will take longer than later ones as you learn to work with thin layers. You will need a gel polish kit, a curing lamp, and a few basic prep tools listed below.

Get beauty and skincare favorites delivered free — and shop member deals
- Fast, free delivery on millions of items
- Access to Prime Big Deal Days deals on October 6–7
- Prime Video, Amazon Music and more included

ROSALIND 30-Piece Gel Nail Polish Set with Base and Top Coats
- ✔ Number of bottles: 30
- ✔ Gel polish colors: 26
- ✔ Base and top coats: 4 no-wipe coats: glossy, matte, and glitter

COSCELIA 53-Piece Gel Nail Polish Kit with UV/LED Light and Nail Drill, 35 Colors
- ✔ Pieces: 53
- ✔ Gel polish colors: 35
- ✔ Top and base coats: 5 pieces

JODSONE 60-Piece Gel Nail Polish Kit with UV Nail Lamp
- ✔ Colored gel polishes: 55 bottles, 5 ml each
- ✔ Base coat: 2 bottles
- ✔ Glossy top coat: 2 bottles
Difficulty: Beginner | Time: 45-60 minutes for a full manicure
What You’ll Need
Tools & Materials:
- UV or LED nail lamp (check your polish brand’s recommended lamp type — most modern gels work with LED)
- UV gel nail polish set: base coat, color polish, and top coat from the same brand
- 100/180 grit nail file
- Buffer block
- Cuticle pusher (metal or wooden orange stick)
- Cuticle oil
- Lint-free wipes or cotton pads
- Isopropyl alcohol (90% or higher) or brand cleanser solution
- Acetone and foil or soak-off clips for removal later
- Paper towel or mat to protect your work surface
Knowledge:
- Basic familiarity with filing and shaping natural nails
- Awareness that gel must be cured under a lamp and will not air-dry
Lamp compatibility warning: Not all gel polishes cure under every lamp. Check the polish bottle or brand website for the recommended lamp type and wattage. Using an incompatible lamp causes sticky, uncured polish. Also note that gel polish can cause an allergic reaction in some people with repeated skin contact — keep it on the nail plate only, never on skin or cuticles, and stop use if you develop redness, itching, or swelling around the nail.
Work in a room with good lighting but away from bright direct sunlight or strong window light — some gels begin curing under intense daylight, which thickens the polish in the bottle and on the nail before you can spread it evenly.
ROSALIND 30-Piece Gel Nail Polish Set with Base and Top Coats
The ROSALIND set takes a different philosophy from the other two picks: instead of bundling hardware, it spends its entire budget on polish variety and finish options. Across 30 bottles you get 26 colors plus four no-wipe base and top coats in glossy, matte, and glitter finishes, which effectively multiplies your palette. A single red becomes three different looks depending on which top coat you reach for, something the COSCELIA and JODSONE kits cannot fully match in finish diversity.Compared with the JODSONE kit, ROSALIND trades raw color count for curation. JODSONE offers more than double the shades, but ROSALIND’s inclusion of a dedicated glitter top coat makes it more appealing for decorative nail art than a straightforward color library. The formula is designed for smooth application, and the included instruction manual lowers the barrier for first-time gel users who do not want to decipher a 53-piece kit.The obvious tradeoff: there is no lamp included, so this set only makes sense if you already own a UV or LED curing light. Like its rivals, it uses mini 5 ml bottles, which are great for sampling but run dry quickly if you find a favorite shade. For hobbyists focused on designs rather than building a full home salon, that compromise feels reasonable.
Pros:
- Wide 26-color selection suited to nail art and mixing
- Includes glossy, matte, and glitter no-wipe top coats for finish variety
- Smooth application with an instruction manual for at-home beginners
- Up to 21 days of wear with proper UV curing
Cons:
- No curing lamp included, so it requires hardware you already own
- Mini 5 ml bottles deplete quickly with frequent use
Best for: Nail art enthusiasts and at-home manicurists who already own a UV/LED lamp and want glossy, matte, and glitter finish options in one set.
Not ideal for: Complete beginners who do not yet own a curing lamp, or anyone who wants large, long-lasting bottles of a few favorite shades.
Bottom line: The strongest choice for finish-driven nail art — provided you already have a lamp to cure it.
“The strongest choice for finish-driven nail art — provided you already have a lamp to cure it.”
COSCELIA 53-Piece Gel Nail Polish Kit with UV/LED Light and Nail Drill, 35 Colors
Of the three sets, COSCELIA is the only one that treats gel manicure as a complete workflow rather than a polish purchase. Alongside 35 colors and five base/top coats, you get a UV/LED lamp with automatic sensing, three timer settings, and low-heat mode, plus an electric nail drill for grinding, cutting, and polishing. That drill is the key differentiator: neither ROSALIND nor JODSONE includes one, and it is genuinely more effective than hand files for prep work and removal.The polish itself uses a natural resin formula with low odor and a silky texture, which matters more for beginners than it might seem — harsh-smelling gels make home sessions unpleasant and novices nervous. Wear duration lands at 2–3 weeks with proper care, in the same realistic band as the other two sets, so longevity is not the deciding factor here; the hardware bundle is.The tradeoff is complexity. Fifty-three pieces is a lot to unpack for someone who has never done gel nails, and compared with ROSALIND’s streamlined 30 bottles plus a manual, COSCELIA can feel overwhelming on day one. The lamp’s 30 LED beads and auto-sensing help offset that learning curve. This pick makes the most sense for someone starting from zero who would rather buy once and skip the piecemeal accessory shopping entirely.
Pros:
- All-in-one kit with 35 colors, lamp, drill, and nail art tools
- UV/LED lamp with automatic sensing and low-heat mode
- Electric nail drill outperforms traditional files for prep and removal
- Low-odor natural resin formula suits beginners and professionals
Cons:
- 2–3 week wear depends heavily on proper application and care
- 53 pieces can overwhelm absolute beginners
Best for: Beginners building a complete home gel setup in one purchase, or hobbyists who want a lamp, drill, and tools bundled together.
Not ideal for: Buyers who already own a lamp and drill and would be paying twice for hardware, or minimalists who want only polish.
Bottom line: The most complete package here — ideal if you want a full home salon in a single box.
“The most complete package here — ideal if you want a full home salon in a single box.”
JODSONE 60-Piece Gel Nail Polish Kit with UV Nail Lamp
If variety is the goal, JODSONE delivers the largest library of the three: 55 colored polishes alongside two base coats, two glossy top coats, and a matte top coat, plus a smart lamp and manicure tools. Compared with COSCELIA, it trades the nail drill for twenty extra colors — a swap that makes sense for buyers who prioritize shade selection over prep hardware.Unlike ROSALIND, JODSONE includes its own 30-LED curing lamp with 5-, 30-, and 60-second modes and automatic on/off operation, so it works as a one-box starter set even though its focus is the palette. The dual top coats — glossy and matte — give you two finish directions per color, though it lacks ROSALIND’s glitter option, so decorative looks are slightly less versatile despite the bigger color count.Where this kit sits in the ranking is a question of priorities. It covers the middle ground between ROSALIND’s finish-focused art set and COSCELIA’s hardware-heavy bundle: more colors than either, but less finish variety than ROSALIND and no drill like COSCELIA. Claimed wear of about 21 days matches the others. With 55 bottles at 5 ml each, storage also becomes a real consideration — this is a set for organizers, not tiny bathroom drawers.
Pros:
- Largest palette of the three with 55 polish colors
- Includes a smart 30-LED lamp with three curing modes and auto on/off
- Both glossy and matte top coats included
- Manicure tools bundled for at-home use
Cons:
- Polish cannot be used without a nail lamp, tying you to the included device
- No glitter top coat, limiting decorative finish options versus ROSALIND
- 60 pieces demand significant storage and organization
Best for: Color-obsessed home manicurists who want maximum shade options plus a lamp in one affordable package.
Not ideal for: Buyers who need serious prep tools like a nail drill, or anyone short on storage space for 60 pieces.
Bottom line: The best pick when sheer color choice matters most and a bundled lamp is all the hardware you need.
“The best pick when sheer color choice matters most and a bundled lamp is all the hardware you need.”
As an Amazon Associate we earn from qualifying purchases.
Before You Start
Wash your hands and dry them completely. Set up your workspace with the lamp plugged in, all three bottles (base, color, top) opened and within reach, and your wipes and cleanser ready. Read the cure times printed on your bottles — these override any generic timing in this guide, because brands vary. As a general rule, base coats and thin color coats cure for 30-60 seconds under an LED lamp and 1-2 minutes under a UV lamp. Do one hand at a time from start to finish; attempting all ten nails per layer at once works too, but beginners find one hand at a time easier to control.
Know what the inhibition layer is before you start: after curing, gel polish surfaces remain slightly sticky. This is normal. The stickiness is wiped off only at the very end, after the top coat — do not panic and do not wipe between every layer unless your brand’s instructions say so.
Step-by-Step Instructions
Step 1: Shape and file the nails
File each nail to your desired shape — square, round, or squoval — using the 100/180 grit file. File in one direction rather than sawing back and forth, which weakens the nail edge. Keep all ten nails roughly the same length and shape for a uniform result.
Tip: If any nails are significantly longer than the others, trim them with a clipper first, then file to refine the shape.
Check: All nails are even in length and have a smooth, consistent edge with no rough corners.
Step 2: Buff and dehydrate the nail surface
Lightly buff the shine off the surface of each nail with the buffer block, using small, gentle strokes. You are removing the glossy top layer, not filing the nail down — two or three light passes per nail is enough. Then wipe each nail with a lint-free wipe soaked in isopropyl alcohol to remove dust and natural oils.
Tip: This is the step that determines whether your gel sticks. Any remaining shine or oil will cause lifting and peeling within days. Do not touch your nails with bare fingertips after wiping — the oils from your skin will contaminate the surface.
Check: Nails look matte and slightly frosted, with no shiny patches, and feel completely dry.
Step 3: Push back the cuticles
Gently push back the cuticle on each nail with a cuticle pusher, working from the base of the nail outward. Apply light pressure only — you are moving the skin back, not scraping or cutting it. If cuticles are dry and tight, apply a small amount of cuticle remover first, wait one minute, then push.
Tip: Leave at least a hairline of space between the gel polish and the cuticle when you paint. Gel touching skin is the most common cause of lifting and irritation.
Check: You can see a clear margin of bare nail at the base of each nail, and no skin overlaps the nail plate.
Step 4: Apply a thin base coat and cure
Apply a very thin layer of base coat to each nail on one hand. Sweep the brush from near the cuticle to the tip, cap the free edge by brushing across the nail tip, and keep the polish off your skin. Place the hand in the lamp and cure for the time listed on the base coat bottle.
Tip: Thin means you can still see your nail through the layer. A thick base coat wrinkles and lifts. Wipe any polish off skin immediately with a wipe before curing.
Check: After curing, the base coat is hard to the touch with a slightly tacky surface — this tack is normal and expected.
Step 5: Apply the first color coat and cure
Apply one thin, even layer of color gel polish over the base coat, again starting near the cuticle (leaving that hairline gap), sweeping to the tip, and capping the free edge. Cure in the lamp for the time printed on the color bottle.
Tip: If you accidentally flood the cuticle area with polish, use an orange stick or the brush edge to push the gel back before curing. Once cured, mistakes must be filed or soaked off.
Check: The first coat looks sheer or streaky — this is correct and will be fixed by the second coat. The surface is hard but tacky.
Step 6: Apply the second color coat and cure
Apply a second thin layer of color the same way as the first, capping the free edge again, and cure for the same time. Two thin coats always beat one thick coat — thick gel shrinks, wrinkles, and cures unevenly.
Tip: Check for even opacity in good light after curing. Very light or very dark shades occasionally need a third thin coat; most colors need only two.
Check: The color looks smooth, even, and fully opaque with no visible streaks or bald patches.
Step 7: Apply the top coat and cure
Apply a thin layer of top coat over the entire color surface, sealing the free edge carefully. Cure for the time listed on the top coat bottle — often slightly longer than color coats. This is the layer that provides shine and chip resistance, so full coverage of the nail edge matters most here.
Tip: No-wipe top coats skip the next step; traditional top coats require the alcohol wipe. Check your bottle label before proceeding.
Check: The top coat is hard with an even shine, though the surface may still feel sticky if it is a traditional (not no-wipe) formula.
Step 8: Wipe off the inhibition layer and finish
Wipe each nail with a fresh lint-free wipe soaked in isopropyl alcohol to remove the sticky inhibition layer. Use a light touch and a clean section of the wipe per nail. Finish by massaging a drop of cuticle oil into the skin around each nail.
Tip: If a nail still feels tacky after wiping, wipe once more with a fresh alcohol-dampened wipe. Persistent stickiness after two wipes usually means under-curing — see Troubleshooting.
Check: Nails are completely dry, glossy, and smooth to the touch. You can wash your hands and use them normally immediately.
Step 9: Repeat on the other hand
Repeat steps 4 through 8 on your other hand, one layer and one cure at a time. If your lamp fits both hands side by side, you can cure two nails at a time per coat to speed up the process on future manicures.
Check: Both hands match in color, shine, and coverage.
Common Mistakes to Avoid
- Applying thick layers to save time — Thick gel wrinkles, shrinks, and stays soft in the middle because UV light cannot penetrate fully. Always apply multiple thin coats and cure each one individually.
- Getting gel polish on the skin or cuticles — Leave a hairline gap between the polish and the cuticle, and clean up any skin contact with a wipe before curing. Gel touching skin causes lifting within days and raises the risk of allergic reaction.
- Skipping the alcohol wipe before painting — Natural oils on the nail are invisible but prevent adhesion. Wipe every nail with alcohol after buffing and avoid touching the nail plate afterward.
- Using an incompatible lamp or wrong cure times — Check the polish brand’s recommended lamp type and wattage before buying or applying. Follow the cure times printed on each bottle rather than generic timings, and replace lamp bulbs or the lamp itself if cure times seem inconsistent.
Troubleshooting
Problem: Polish stays sticky after the final alcohol wipe
Solution: The layer is too thick or the lamp is too weak. Cure the nail again for an additional 60 seconds, then re-wipe. If stickiness persists across all nails, your lamp likely does not match the polish brand — test with a different lamp or polish.
Problem: Gel peels or lifts at the cuticle within a few days
Solution: Lifting means the surface was not properly prepped or polish touched skin. For future applications, buff more thoroughly, wipe with alcohol right before the base coat, and keep polish off the cuticle. For the current manicure, file and smooth the lifted edge and seal it with a thin layer of top coat, or remove and redo the affected nails.
Problem: Color looks streaky or patchy
Solution: The coats were applied too thickly or unevenly, or you tried to spread polish that had begun to set. Add one more thin color coat and cure fully. Next time, load a moderate amount of polish and make three confident strokes instead of reworking the same area.
Problem: Gel wrinkles or shrinks during curing
Solution: The layer was too thick, or the nail was moved in the lamp before the gel set. Apply thinner coats, cap the edge, and keep the hand still until the timer finishes. Wrinkled nails must be removed and redone — curing again will not smooth them.
What Success Looks Like
Your manicure is complete when all ten nails are dry, glossy, and smooth immediately after the final alcohol wipe, with no sticky residue and no dents from touching. Run a fingertip across each nail: the surface should feel like glass with no ridges or bumps at the cuticle line. Color should be even and opaque, and the free edge of each nail should be sealed with polish. You can wash dishes, type, and shower right away. A successful gel manicure shows no chipping or lifting for at least two weeks; visible growth at the cuticle after two to three weeks is normal and simply signals time for removal or a refill.
Next Steps
Reapply cuticle oil daily to keep the surrounding skin hydrated and reduce the risk of lifting. When you are ready for a new color, do not peel or pick the gel off — peeling removes layers of your natural nail. Soak off the polish properly by buffing the shine off the top coat, soaking cotton in acetone, pressing it onto each nail, wrapping in foil (or using soak-off clips) for 10-15 minutes, then gently pushing the softened gel off with an orange stick. Give your nails a break of a few days between gel manicures if they feel dry or weak, and moisturize generously. If you notice persistent redness, itching, or blistering around the nail bed at any point, remove the polish and consult a dermatologist before using gel products again.
Frequently Asked Questions
Can I use a UV gel polish set without a lamp?
No. UV gel polish does not air-dry; the chemicals only harden when exposed to UV or LED light. A regular hair dryer or sunlight will not cure it properly, and uncured gel will smear and remain sticky indefinitely.
Is an LED lamp or UV lamp better for gel polish?
LED lamps cure most modern gel polishes faster (typically 30-60 seconds per layer) and last longer because the bulbs do not need replacement. UV lamps cure some older or specialty formulas that LED cannot handle. Match the lamp to whatever your polish brand recommends on the bottle or its website.
Why is my gel still tacky after curing, and is that normal?
A slightly sticky surface after curing is the inhibition layer, and it is completely normal. It is removed by wiping with isopropyl alcohol after the final top coat. If the nail feels wet or the polish moves when pressed, it is under-cured — cure it longer or check lamp compatibility.
How long does a home gel manicure last?
Typically two to three weeks. It fails sooner if the nail prep was incomplete, layers were too thick, or polish touched the cuticles. With good prep, gel usually only shows natural nail growth before it shows wear.
Can I mix gel polish brands within one manicure?
It is safest to use a base coat, color, and top coat from the same brand, since they are formulated to cure and adhere together. Mixing brands usually works, but when lifting or curing problems appear, the combination is the first thing to suspect. Base coat is the layer where mismatch matters most.
Fall Picks
fall essentials
As an affiliate, we earn on qualifying purchases.