TL;DR
A gel nail polish kit usually combines gel polish with some combination of a curing lamp, base coat, top coat, and prep tools. Choose a system with clear product-specific curing and removal instructions, keep uncured gel off your skin, and never judge lamp compatibility by wattage alone.
A glossy gel manicure can look freshly painted long after a regular polish job has started to chip, but the lamp and polish in your kit need to work together. A bright little lamp and a box of colorful bottles may look like a bargain. The details that matter most are often printed in small type on the instructions.

Get beauty and skincare favorites delivered free with Prime
- Fast, free delivery on millions of items
- Prime Video, Amazon Music and more included
- Member-only deals all year
This guide explains what a gel nail polish kit usually includes, how lamp compatibility affects curing, and what to check before you buy. You’ll also get a practical application and removal routine, plus ways to compare home use with a salon visit. The goal is simple: help you choose a kit you can use carefully and confidently, without treating a high color count as proof of quality.
Check whether the kit contains soak-off gel polish or hard gel, since their removal methods differ.
Match the lamp to the polish maker’s instructions; wattage alone does not prove compatibility.
Apply thin layers, cure each one as directed, and clean gel off skin before curing.
Follow the specific removal method for your product instead of peeling or scraping it off.
Compare instructions, replacement supplies, and product details alongside the kit’s price and color count.
Know what comes in a gel nail polish kit before you buy
A gel nail polish kit is a bundle of products for applying and curing gel color, usually with a lamp and some combination of base coat, top coat, polish, and prep tools. Some kits add files, cuticle tools, removal wraps, or several shades. Before you order, check which gel system the bottles use: soak-off gel polish and hard gel have different jobs and removal needs.
That distinction affects both the manicure you get and the effort needed to take it off. Soak-off gel polish is typically a thin color layer intended to soften with the recommended remover after its seal is filed. Hard gel is a more structural product, so removal generally involves filing rather than soaking. If you assume a hard gel can be removed like soak-off polish, you may spend longer soaking or be tempted to scrape at the nail when it does not release. A kit photo may show matching bottles and a lamp, but it may not make the product type obvious. Read the product descriptions and instructions before treating every bottle labeled “gel” as interchangeable.
For example, imagine you buy a starter kit for a weekend manicure and later discover it contains a hard gel builder product with no clear removal directions. You may have expected a simple soak-off routine, but the product could require a different technique and more time. A useful kit usually includes clear instructions for application and removal, not just a row of attractive colors. Check whether replacement base and top coats are available, too: those basics are used across manicures, and a single empty or incompatible bottle can limit the usefulness of every shade in the box.
Look for specific product names, manufacturer details, and a complete list of what’s in the box. A kit that says it contains gel polish and a lamp still leaves questions: Does it include base and top coats? Which lamp does the polish require? Does the maker explain removal? These answers help you estimate the real cost and effort of ownership. A lower-priced bundle can be poor value if you must later buy compatible essentials or cannot confidently remove its products.
Products Worth Considering

BowFlex Results Series SelectTech Adjustable Dumbbells, Pair

Therabody Theragun Prime 6th Gen Deep Tissue Massage Gun

Levoit Vital 100S-P Air Purifier
As an affiliate, we earn on qualifying purchases.
Match the lamp to the polish to get a proper cure
A gel nail polish kit needs a lamp that matches the polish maker’s curing instructions. Curing depends on the lamp’s wavelength and output, along with the gel’s formulation; the words “UV” or “LED” and a big wattage number do not settle compatibility on their own. Follow the specified exposure time and layer guidance for each product in the system. This matters because a lamp can light up and still fail to provide the conditions the product needs.
Gel hardens through a light-activated chemical reaction, while regular polish dries as solvents evaporate. A cured layer can feel firm, but that surface feel does not prove the gel underneath has cured properly. Thick coats can block light from reaching lower material, and a lamp that does not suit the product may leave gel undercured. That can undermine wear and leave reactive ingredients in the product. Adding extra time at random does not fix an incompatible lamp or an application that ignores the product directions; it may simply add exposure without resolving the underlying mismatch.
Suppose your kit’s instructions call for thin coats and a particular lamp, but you apply one thick layer because you’re rushing before dinner. The color might look smooth at first, yet the product may not cure as intended. Work in thin layers so light can reach through the coating, and cure each one as directed. Keep polish off the skin and cuticles, and clean up accidental smears before curing. These steps work together: choosing a compatible lamp cannot compensate for thick application or gel cured on skin.
When comparing kits, prioritize lamp compatibility, clear timing instructions, and a named polish system over wattage claims. If the product maker does not explain which lamp to use, or how long each layer needs, you cannot reliably judge whether the kit’s parts work together. That uncertainty makes the kit harder to use responsibly and makes comparisons with other kits less meaningful. An all-in-one box only helps when its parts are designed to work together.
Use this simple routine for neater, longer-wearing gel
A careful gel manicure follows the product maker’s sequence: prepare the nail, apply thin layers, cure each layer with the specified lamp, then finish with top coat. Keep gel away from your skin and cuticles throughout. Each step supports the next: clean preparation helps the coating adhere, thin layers help the lamp cure it as directed, and careful cleanup prevents stray gel from being cured on skin. Small details—like wiping a stray bead from your thumb before curing—can make the difference between a tidy manicure and product cured where you did not want it.
- Read the system instructions and set out the lamp, polish, and tools before you start. This helps you follow the maker’s sequence and avoid improvising when a layer is ready to cure.
- Prepare clean nails as directed, taking care not to injure the surrounding skin. Preparation can affect how well the coating wears, but aggressive work on the nail or cuticle can cause discomfort and damage.
- Apply a thin base coat, keeping it off your skin, then cure for the specified time. A thin, even layer is easier for light to reach through than a thick pool near the edges.
- Add thin color coats, curing each layer as directed instead of piling on one thick coat. Building coverage gradually gives you more control and helps avoid a soft or uneven layer.
- Finish with top coat and follow the maker’s final curing directions. The top coat completes the system, so using a different product without checking compatibility can change the result.
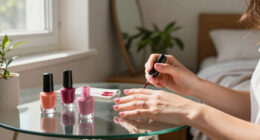
Picture a Sunday evening manicure: you have a dark berry color, a small lamp, and just enough time before bed. A thin first coat may look a little sheer, but adding another thin coat after curing usually gives you more control than trying to cover the nail in one heavy pass. The tradeoff is a little more time in exchange for a more even application. If polish touches a cuticle, clean it up before that layer goes under the lamp; curing the smear can make it harder to remove and increases unwanted skin exposure.
There is a learning curve. A home kit can take practice to apply evenly, and results vary with the product, your nail condition, daily wear, and application. A manicure may wear longer than ordinary polish, but no kit can promise the same result for every person. Take your time and judge the routine by how comfortably you can follow it, not just by the shine in the box photo. If the process feels difficult to control, the extra convenience or lower per-manicure cost may not be worth it for your routine.
Remove gel gently to protect your natural nails
Remove gel polish using the product’s own directions, which may call for filing the top layer and then soaking the color with a recommended remover. Avoid peeling or forcefully scraping the coating from your nail. A coating that resists lifting is a sign to follow the specified method and allow it more time, not to pull harder. The coating may come away in satisfying little flakes, but pulling it off can take layers of natural nail with it and leave the surface rough or weak.
Soak-off products and hard gel do not follow the same removal method. Many soak-off polishes are designed to soften after the surface seal is filed, while hard gel generally requires filing. Using the wrong method may waste time and encourage extra scraping or filing, which can thin the natural nail. If your kit contains a product that needs a different removal approach, do not assume a familiar soak-off routine will work. Read the bottle or manufacturer instructions before reaching for tools.
For example, after a busy week of typing, the edge of one nail may start to lift. That can tempt you to pick at it while watching a show. Instead, pause and follow the kit’s removal directions, even if that means waiting until you have time to do it properly. Waiting may be inconvenient, but it gives you time to gather the correct remover and tools and reduces the chance that a quick peel turns a small lift into nail damage.
Repeated aggressive filing, peeling, or scraping can thin and weaken natural nails. Gel itself does not inevitably damage them; technique and removal habits matter. If a nail feels sore or looks damaged, give it a break from further product and avoid filing it more. Choose a kit with clear removal guidance and the supplies or instructions needed to remove its specific gel system. Removal is part of the kit’s real cost: a product that is inexpensive to buy may demand more time or specialized supplies at the end of each manicure.
Choose a kit for clear instructions, not the biggest color bundle
The best-value gel nail polish kit is the one whose lamp, products, and instructions suit the way you plan to use it. A low price or dozens of shades may be tempting, but color count and advertised lamp wattage do not guarantee a good cure or durable wear. Check product compatibility, ingredient and manufacturer information, application guidance, and whether you can buy replacement products. These details help distinguish a bundle that is ready for repeated use from one whose headline price leaves essential questions—or future purchases—unanswered.
| What to compare | Why it matters | What to look for |
|---|---|---|
| Lamp and polish match | The system needs suitable curing conditions. | Product-specific lamp guidance and cure times. |
| Gel type | Different systems can need different removal methods. | Clear labeling for soak-off polish or hard gel. |
| Instructions | Thin coats and careful handling affect use. | Steps for prep, application, curing, and removal. |
| Replacement supplies | Missing or empty basics can limit the bundle. | Available base coat, top coat, and compatible colors. |
Consider what a typical evening looks like for you. If you want to do an occasional manicure at home, a compact starter kit with fewer shades and clear instructions may suit you better than a large set you rarely use. A large bundle spreads the purchase across more products, but only if you actually use them; otherwise the extra colors add clutter rather than value. If you already own compatible tools, compare whether the bundle duplicates them. Some kits offer a helpful combination of lamp, coats, colors, and prep items; the number of pieces matters less than whether you can use them as a system.
Home kits offer convenience and can cost less per manicure over time, while a salon may offer trained application and products selected by a professional. The home option asks you to learn the application and removal routine and supply your own time and tools; the salon shifts much of that work to a technician and usually costs more per visit. Neither setting removes the need for careful curing, skin protection, and appropriate removal. If you are new to gel, a salon visit can help you see a careful application routine up close before deciding whether the added time and responsibility of a home kit fit your habits.
Reduce skin exposure and take sensitivity concerns seriously
Gel products can trigger allergic contact dermatitis in some people, especially when uncured ingredients touch the skin. Symptoms can include itching, redness, swelling, or blistering around the nails, and reactions may also appear elsewhere. Skin contact matters because sensitization can develop after exposure, so a small smear is not something to ignore just because it looks harmless. Stop using the product and seek medical advice if you notice a reaction; do not try to cover it with another manicure.
Careful use starts before the lamp turns on. Avoid applying gel to damaged or irritated skin, and clean up accidental contact before curing. Do not use professional-use products unless you understand their handling requirements; products intended for trained settings may require more precise application or specific precautions. A label such as HEMA-free means the formula is made without HEMA, an ingredient used in some nail products that is known to cause sensitization; it does not mean the product cannot cause an allergy, since other ingredients may also trigger reactions.
Imagine a tiny stripe of base coat has slipped onto the skin beside your nail. It may look harmless, especially under a dark color, but uncured product should not be left there and cured in place. Pause, remove the stray gel as directed, then continue only when the nail and skin are clean. Good lighting and a small cleanup tool can help you spot smudges before curing; setting them out first makes cleanup easier than trying to improvise mid-application.
UV exposure from manicure lamps is also a topic people ask about. If you have concerns about exposure, follow medical guidance and ask a dermatologist about practical precautions for your situation. During pregnancy or with a pre-existing condition, discuss personal concerns with your clinician. Follow product instructions, use good ventilation, and keep gel away from skin; those steps support safer use but cannot promise a risk-free experience. The practical choice is to weigh the convenience of an at-home kit against the care required to control exposure during application and curing.
Frequently Asked Questions
How long does gel polish last?
Gel polish often lasts longer than regular polish, but wear varies with the product, preparation, application, nail condition, and daily activities. A careful thin-layer application may wear differently from a rushed manicure exposed to frequent washing or hands-on work.
Can I use any UV or LED lamp with any gel polish?
No. Check the polish maker’s lamp and curing instructions because the lamp’s wavelength and output need to suit the formula. Wattage alone does not establish compatibility.
How do I remove gel polish at home?
Follow the product’s directions, which may involve filing the top coat and soaking the polish with a recommended remover. Do not peel or forcefully scrape it away, and check whether your product is soak-off polish or hard gel.
Can gel polish cause an allergy?
Yes. Uncured gel ingredients can cause an allergic reaction in some people, particularly after skin exposure. Stop using the product and seek medical advice if you develop itching, redness, swelling, or blistering.
Does HEMA-free mean a gel polish cannot cause an allergy?
No. HEMA-free means the formula does not contain HEMA, which is used in some nail products and is known to cause sensitization. Other ingredients may still cause a reaction, so avoid skin contact and follow the product instructions.
Can I use gel polish without a lamp?
Conventional gel polish needs the specified lamp to cure. A regular polish sold as “gel-effect” may have a glossy look but usually air-dries and is a different product.
Conclusion
Choose a gel nail polish kit by how clearly its products work together: the gel type, compatible lamp, curing directions, and removal method should all make sense before your first coat. Then apply thin layers, keep uncured gel off your skin, and take your time when removing it.
A bright shine is lovely; healthy, comfortable nails matter more. Let the small print guide your choice, and let patience do the polishing.