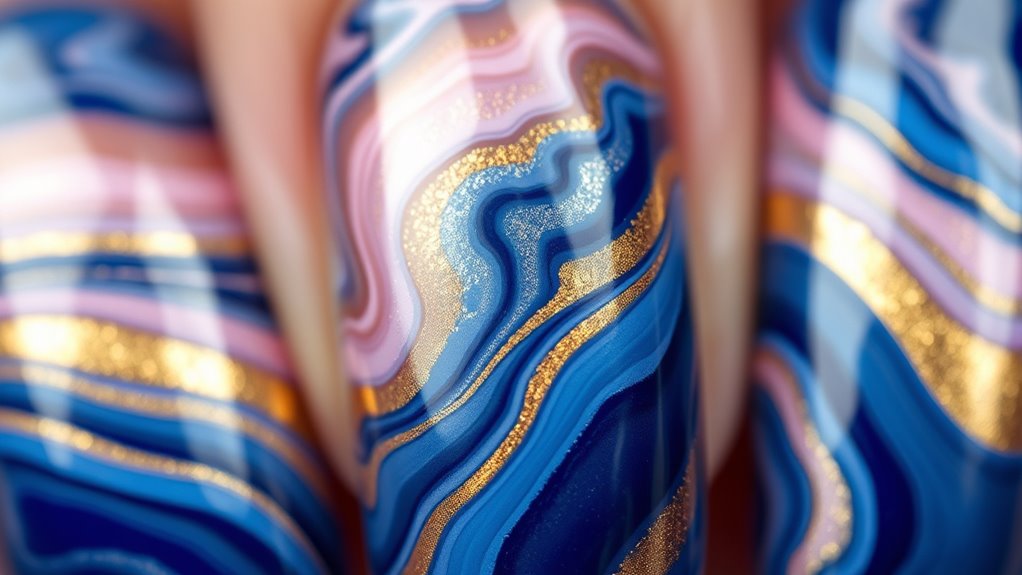

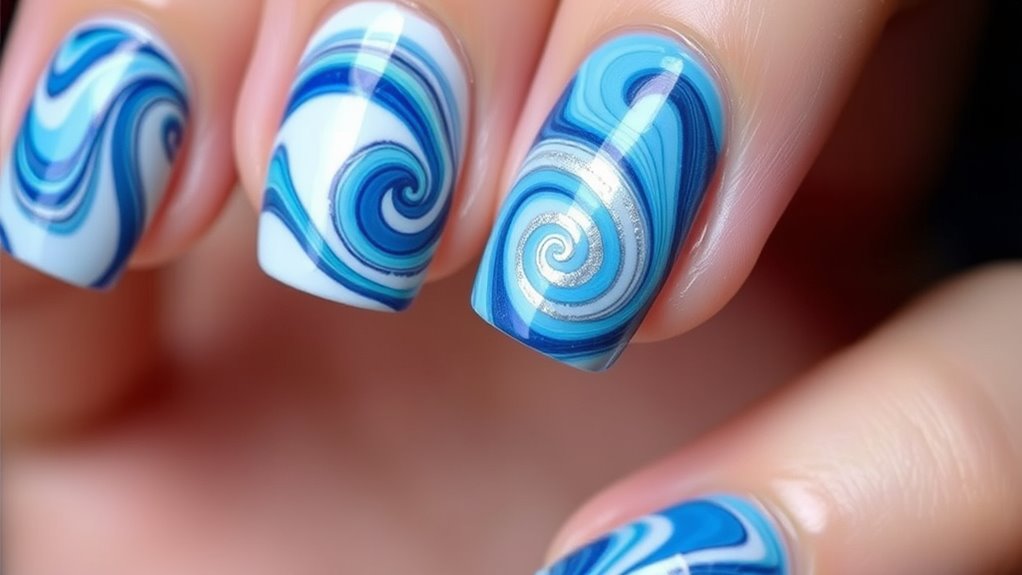
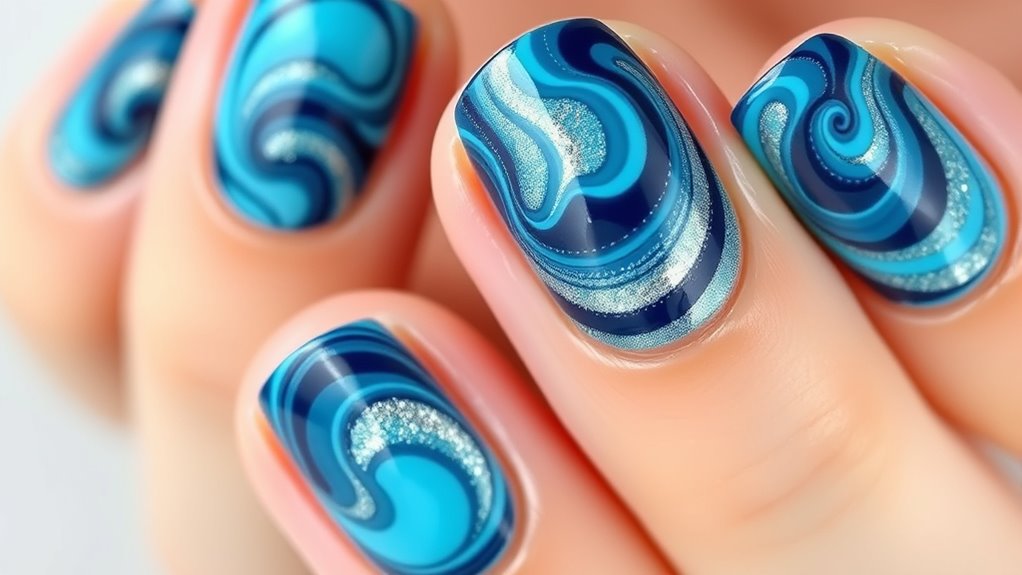
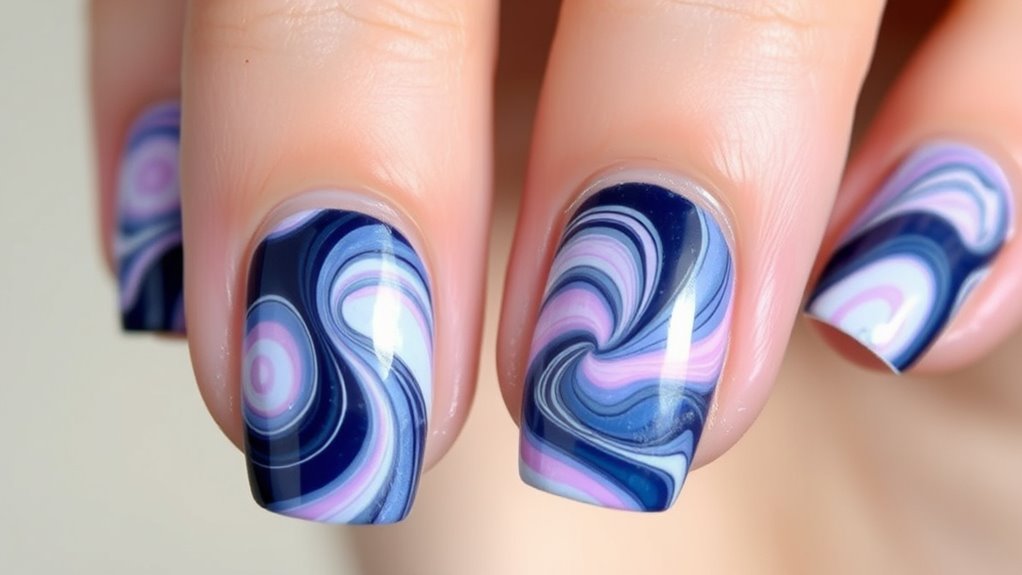
To create stunning water marble nails, start by gathering thin nail brushes, a shallow dish, and your favorite polish colors. Prepare your nails by cleaning, shaping, and applying a base coat. Drop polish onto water to form circles, then use a toothpick to swirl the colors into unique patterns. Dip your nails carefully, then clean up excess polish and finish with topcoat. For detailed tips on perfecting your swirl designs, keep exploring these easy tricks.
Key Takeaways
- Prepare nails with a clean base coat and shape for optimal water marbling results.
- Choose 2-3 harmonious colors and use a shallow dish for easy nail dipping.
- Drop polish onto water, create patterns with a toothpick, then dip nails carefully.
- Use a small brush to clean edges and remove excess polish for a neat finish.
- Practice steady hand movements and quick layering for crisp, intricate swirl designs.
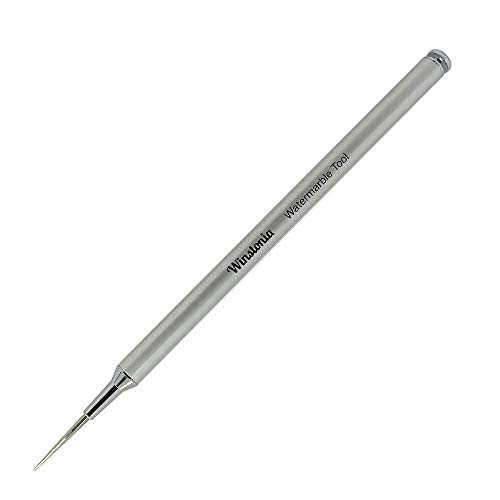
Winstonia Nail Art Water Marble Tool for Watermarbling Pattern Manicure – Pointy Stainless Steel Picker Pen
WATERMARBLING TOOL: A perfect tool that delivers smooth and sleek watermarble nail art design. Its pointy tip allows…
As an affiliate, we earn on qualifying purchases.
As an affiliate, we earn on qualifying purchases.
Gathering Your Materials and Tools
To create stunning water marble nails, start by gathering all the necessary materials and tools. Your choice of brush selection is important; opt for a thin, fine-tipped brush to help clean up edges and fix design mistakes. When selecting a container, go for a shallow, wide-mouthed dish that’s large enough for your nails to fit comfortably without touching the sides. Glass or plastic containers work well because they’re easy to clean and won’t react with nail polish. Make sure the container isn’t too deep, so you can easily access the water surface. Having the right container choice and quality brushes makes the water marbling process smoother and more precise, setting a strong foundation for creating intricate, swirl designs. Additionally, understanding the sound vibrations involved in artistic techniques can inspire more harmonious and fluid marble patterns.

Bulex 2 Pack Dappen Dish Cups for Nail Art Acrylic Liquid – Clear Glass Nail Monomer Liquid Bowl Dampen Dish Acrylic Powder Holder, Acrylic Glass Jar for Nails
Dapping dishes cup is a small container, used in the nail art process to hold and mix acrylic…
As an affiliate, we earn on qualifying purchases.
As an affiliate, we earn on qualifying purchases.
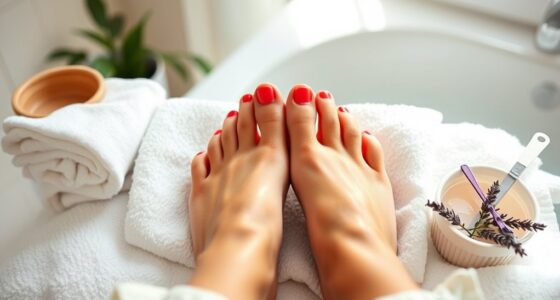
Preparing Your Nails for Water Marbling

Start by cleaning your nails thoroughly to remove oils and dirt, ensuring the polish adheres properly. Next, shape your nails to your preferred style for a neat finish. Finally, apply a base coat to protect your nails and create a smooth surface for the water marbling design. Using a smooth, even surface helps achieve better results in the water marbling process.
Clean and Shape Nails
Before you begin water marbling, proper nail cleaning and shaping are essential. Start by ensuring good nail hygiene; wash your hands thoroughly to remove dirt and oils that can interfere with polish adhesion. Gently push back your cuticles using a cuticle pusher, but avoid cutting them, as healthy cuticle care prevents infections and creates a clean base. File your nails into the desired shape, smoothing rough edges and reducing length if necessary. Clean the nails again to remove any dust or debris from filing. Well-prepared nails provide a smooth surface, making it easier for the water marbling design to adhere evenly. Additionally, understanding nail preparation techniques can help ensure a flawless finish. Taking these steps guarantees your nails are clean and shaped properly, setting the stage for a flawless water marble manicure.
Apply Base Coat
Applying a base coat is a essential step to guarantee your water marbling design looks smooth and lasts longer. Start with a brightening base to enhance nail color and create a clean surface. Use a nail primer to improve adhesion, ensuring your polish stays put. Here’s why it matters:
- Creates a smooth surface for even water marble application.
- Prevents staining from vibrant nail polish colors.
- Enhances color vibrancy by providing a bright foundation.
- Extends nail durability, reducing chips and peeling.

GEMSANVA Nail Art Clean Up Brushes,3PCS Nail Brush For Cleaning Polish Mistakes on the Cuticles,Flat/Oval/Fine Angled Gel Nail Brushes For Nail Art Design Painting and DIY Tools (BLACK PURPLE)
You Will Receive 3pcs Nail Painting Brushes With Different Shaped Heads:Flat/Oval/Fine Angled,Enough For Your To Clean The Excess…
As an affiliate, we earn on qualifying purchases.
As an affiliate, we earn on qualifying purchases.
Choosing the Perfect Color Palette

Choosing the right color palette can make your water marbling nails stand out. Think about color harmony tips, like pairing contrasting shades or complementary hues, to create striking designs. You might also consider seasonal palettes to keep your nails fresh and timely. Incorporating color coordination can further enhance your overall nail art aesthetic.
Color Harmony Tips
Selecting the right color palette is essential for creating a stunning water marble design. To achieve harmony, consider these tips:
- Use harmonious color pairing by choosing shades that complement each other naturally.
- Focus on shade contrast to make your design pop without overwhelming the eye.
- Limit your palette to 2-3 colors for a balanced, cohesive look.
- Test your color choices on a small surface before applying to nails for better coordination.
- Be mindful of color theory principles to enhance the visual impact of your swirl.
Balancing color pairing and shade contrast helps your swirl stand out while maintaining visual appeal. Avoid clashing hues that disrupt harmony, and opt for shades that work well together. Remember, a well-chosen palette enhances your water marble nails, making your swirl art truly entrancing.
Contrasting vs. Complementary
When deciding between contrasting and complementary colors for your water marble nails, understanding their effects can make all the difference. Color theory explains that contrasting colors, like black and white, create strong visual contrast, making your design pop and stand out. These combinations draw attention and add drama to your nails. On the other hand, complementary colors, such as blue and orange, are opposite each other on the color wheel. They provide harmony and balance, resulting in a more cohesive and pleasing look. Knowing how visual contrast influences perception helps you choose the right palette for your style. Whether you want bold impact or subtle harmony, grasping the principles of color theory allows you to select shades that enhance your water marble design perfectly. Additionally, understanding personality traits can help you choose colors that reflect your individual style and mood.
Seasonal Palette Ideas
A well-curated seasonal palette can transform your water marble nails from simple to stunning by capturing the essence of each time of year. To choose the perfect colors, consider these key ideas:
- Embrace seasonal inspiration—think warm tones for autumn or cool pastels for spring.
- Use color blocking to create bold, eye-catching contrasts that highlight the swirl design.
- Limit your palette to 3-4 shades to keep the water marble balanced and harmonious.
- Select colors that evoke the mood you want to express, whether festive, calming, or vibrant.

Young Nails Striper Brush – Natural Hair Fine-Tipped Nail Art Brush for Precision Designs, Ideal for Fine Lines, French Tips, Outlines, Intricate Nail Art, Clean Up Brush for Acrylic Nails & Gel Nails
Precision Design – The Young Nails Striper Brush features a non-crimped, super fine tip, perfect for creating intricate…
As an affiliate, we earn on qualifying purchases.
As an affiliate, we earn on qualifying purchases.
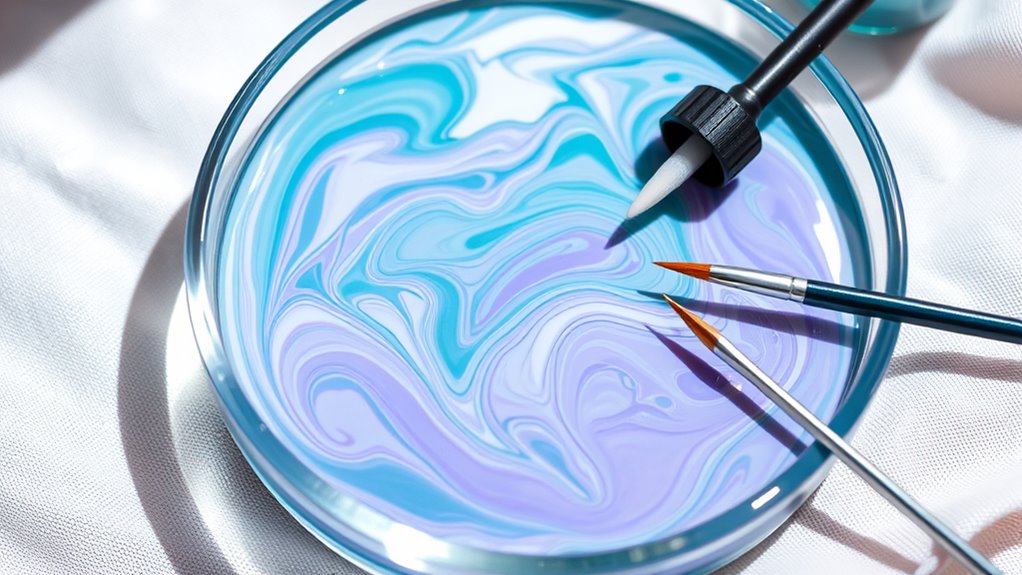
Creating the Water Marble Design
Have you ever wondered how to create a mesmerizing water marble design? It’s all about careful color blending and maintaining design symmetry. First, drop polish onto the water’s surface, forming concentric rings. Use a toothpick to gently swirl the colors, creating a unique pattern. To achieve a balanced look, work from the center outward, ensuring the colors flow smoothly. Here’s a quick overview:
| Step | Action |
|---|---|
| 1 | Drop polish onto water, forming rings |
| 2 | Use toothpick to swirl colors gently |
| 3 | Keep the pattern symmetrical |
| 4 | Adjust swirling for desired design |
| 5 | Dip your nail carefully into the water |
This process results in a stunning, cohesive swirl that showcases your skill in color blending and symmetry. Additionally, practicing water marble techniques can help refine your skills for more intricate designs.
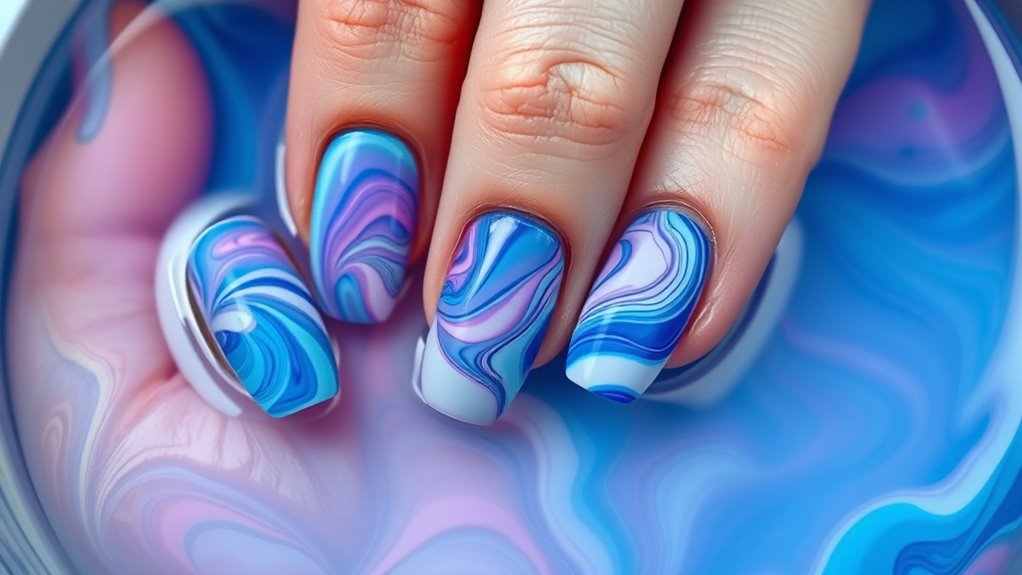
Applying the Swirl Technique
Once you’ve prepared your water and polish rings, applying the swirl technique is straightforward. Dip your nail carefully into the water, then gently lift it out to reveal a beautiful marble pattern. To achieve the perfect swirl technique, keep these tips in mind:
- Start with a steady hand—small, controlled movements create cleaner lines.
- Use multiple colors—layering different shades enhances the marble pattern.
- Create a spiral—drag a toothpick or needle from the center outward to form intricate swirls.
- Be patient—timing and practice improve the swirl technique’s precision.
- Maintain proper air quality during the process, as cleaner air can help you work more precisely and avoid dust or debris settling on your design.
Mastering these steps ensures your swirl technique produces stunning water marble nails, showcasing a flawless marble pattern every time.
Cleaning Up Excess Polish and Finishing Touches

After you’ve finished creating your water marble design, it’s important to clean up any excess polish around your nails to achieve a neat, professional look. Use a small brush dipped in nail polish remover to carefully trim away polish from your cuticle area, ensuring clean edges. Once the polish is removed, take time for cuticle care by gently pushing back your cuticles with a cuticle pusher—this enhances the overall appearance. To add a polished finish, lightly buff your nails to smooth out any ridges or uneven surfaces, making your design stand out even more. Be gentle during buffing to avoid damaging your nails. These finishing touches will leave your water marble nails looking flawless and well-maintained, giving you a trusted, stylish look that lasts.
Tips for Achieving Crisp and Clean Designs
To achieve crisp and clean water marble nail designs, starting with a steady hand and a well-prepared workspace makes all the difference. Focus on your brush techniques—use light, controlled strokes to avoid smudging. Proper color blending is essential; gently swirl colors to create smooth gradients without muddying the design. Here are four tips to enhance your results:
Achieve crisp water marble nails with steady hands, controlled brush strokes, smooth color blending, and a clean workspace.
- Use a thin brush for precise detail work and refining edges.
- Practice gentle, consistent movements to maintain sharp lines.
- Keep your workspace clean to prevent accidental smudges.
- Work quickly but carefully to prevent colors from drying or blending too much.
- Incorporate preppy nail styles to add an extra touch of sophistication to your water marble designs.
Mastering these techniques helps create those crisp, professional-looking water marbles you’re aiming for.
Removing the Tape and Showcasing Your Art
Removing the tape carefully is essential to reveal your flawless water marble design without smudges or smears. Gently peel back the tape from around your nails, pulling it away slowly to prevent lifting any polish. This step ensures a clean, sharp edge and helps showcase your intricate swirl. Once the tape is removed, examine your nails for any excess polish or smudges, and tidy up if needed with a small brush or remover. Now, it’s time for the design showcase—your hard work is about to shine. Hold your hands steady under good lighting, and admire the colorful, swirling patterns you’ve created. With the tape removed, your water marble nails are ready for their grand reveal, highlighting your skill and creativity.
Frequently Asked Questions
How Long Does Water Marble Nail Art Typically Last?
Water marble nail art usually lasts about a week with proper nail longevity and maintenance tips. To keep your design looking fresh, avoid harsh chemicals and excessive water exposure, and apply a clear top coat every few days. Proper nail prep, like clean nails and a good base coat, also helps. With these precautions, your swirl pattern stays vibrant, and your nails remain beautiful longer.
Can I Do Water Marbling on Artificial Nails or Only Natural Nails?
Think of water marbling as a dance that works on both natural and artificial nails. You can absolutely do water marbling on artificial nails by properly preparing them—buff the surface, clean thoroughly, and apply a base coat. With the right water marbling techniques, you guarantee the polish adheres smoothly. So, you’re free to experiment and create stunning swirl designs on your artificial nails just as easily as on natural ones.
What Are Common Mistakes to Avoid During Water Marbling?
You should avoid common mistakes like disturbing the smooth water surface, which causes uneven designs. Make sure your paint has proper consistency; too thick or thin can ruin the swirl. Don’t dip your nail too quickly or at an awkward angle, as it can create smudges. Also, skip using leftover polish, and clean your tools regularly. Practicing patience helps you achieve flawless water marbling results every time.
Does Water Temperature Affect the Marble Design?
You might find it surprising, but water temperature markedly impacts your marble pattern. If the water’s too cold or hot, the pattern can become distorted or uneven, making your design less appealing. Ideally, keep the water at a moderate temperature, around room temperature, to achieve smooth, consistent swirls. This way, your water marble nails will have a beautiful, intricate design that truly stands out and lasts longer.
Can I Reuse the Water for Multiple Nail Designs?
You can reuse water for multiple nail designs, but be cautious about water reuse and contamination concerns. Over time, residual nail polish and debris can build up, affecting the swirl quality and potentially causing contamination. To keep your designs clean and vibrant, change the water frequently, especially if you notice any cloudiness or buildup. Regularly revitalizing the water ensures better results and minimizes contamination risks for each new marble nail art.
Conclusion
Now that you’ve mastered the water marble technique, your nails are ready to shine like a work of art. With patience and practice, each swirl becomes a stroke of your creativity. Remember, every design is a unique dance of colors and patterns—think of it as your personal masterpiece on fingertips. So, embrace the process, enjoy the journey, and let your nails be a canvas that tells your vibrant story.