To create flawless ombre nails using the sponge technique, start by prepping your nails well—clean, shape, and apply a base coat. Choose your base color and let it dry. Select a clean, porous sponge, and dab it lightly into your chosen colors, then gently press onto your nails to blend from tip to base. Keep layering until you’re satisfied, then clean up edges and seal with a top coat. Continue exploring for expert tips to perfect your ombre look.
Key Takeaways
- Choose and prepare a clean, soft sponge for seamless color blending.
- Apply two or more ombre shades onto the sponge in stripes or small patches.
- Lightly dab the sponge onto the nail, working from tip to cuticle for a smooth gradient.
- Reapply polish to the sponge as needed and blend until the desired ombre effect is achieved.
- Finish with a top coat to seal the design and ensure longevity.
Top picks for "step ombre nail"
Open Amazon search results for this keyword.
As an affiliate, we earn on qualifying purchases.
Preparing Your Nails and Supplies

Before you begin creating ombre nails, it’s essential to prepare your nails and gather all the necessary supplies. Start with good nail hygiene by cleaning your nails thoroughly and removing any old polish. Healthy nails provide a better canvas for your nail art and help prevent infections. Understanding nail art history can inspire your design choices and refine your technique. Gather supplies like base coats, sponges, and color gels or polishes. Make sure your tools are clean to avoid smudges or contamination. Preparing your nails involves shaping them with a file, pushing back cuticles, and applying a base coat. This step ensures your ombre design will look smooth and professional. Proper prep sets the foundation for flawless, long-lasting nail art and aligns with best practices in nail art techniques, including maintaining proper sanitation. Additionally, being aware of Dri Dri Gelato options for inspiration can enhance your creative process. Incorporating knowledge of AI security vulnerabilities can also inform how you safeguard your digital tools and resources used during your nail art journey.
Choosing and Applying Base Color
Choosing the right base color sets the tone for your ombre nails, so pick a shade that complements your skin tone and desired look. Make sure to apply a smooth, even coat of base primer to help the polish adhere better and last longer. Once your base coat is dry, you’re ready to start blending those beautiful gradient effects. Incorporating vertical storage solutions can also help you organize your nail supplies efficiently for easy access during your manicure process. Using organized storage can prevent clutter and make your nail art process more streamlined and enjoyable.
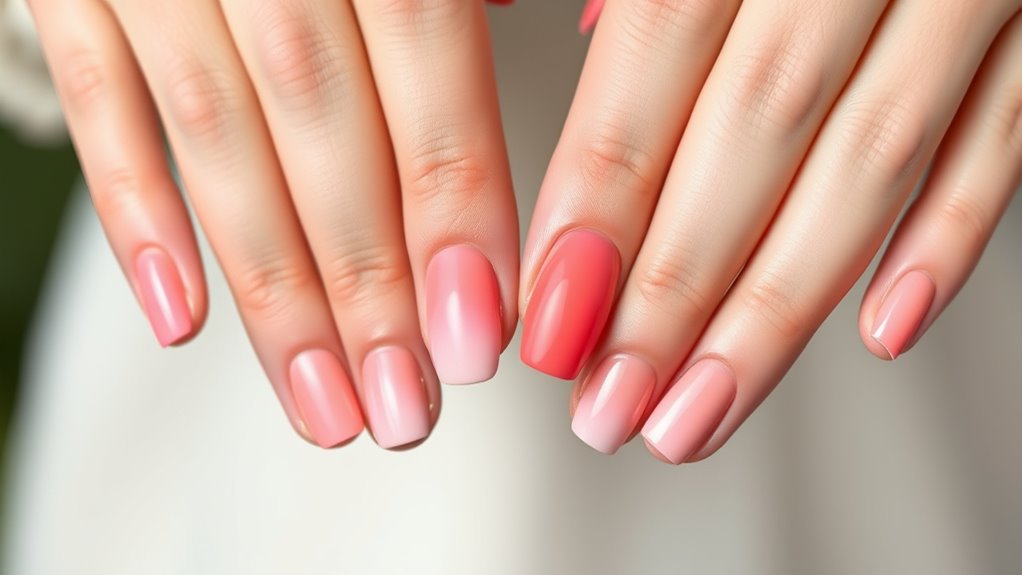
Selecting the Perfect Shade
Are you unsure which base color will best showcase your ombre nails? The right nail shade makes a huge difference in creating a seamless gradient. Consider your skin tone and the ombre color you want to achieve. To help you decide, here’s a quick guide:
| Skin Tone | Recommended Nail Shade |
|---|---|
| Fair | Pale pink, lavender |
| Medium | Peach, soft coral |
| Olive | Warm beige, caramel |
| Dark | Deep burgundy, navy |
Choosing the right nail shade guarantees your ombre color pops and blends beautifully. Picking a shade that complements your style and skin tone can also enhance your overall look. Additionally, selecting a hydrating skincare routine can help your nails and skin look their best during the process. Maintaining proper hydration and nourishment supports healthy nails, ensuring a more polished finish. Incorporating professional application techniques can also improve the final result and make your ombre nails last longer. To achieve optimal results, selecting color-matching tools can assist in blending shades smoothly and accurately.
Applying Base Coat Properly
To achieve a smooth and long-lasting ombre effect, applying a proper base coat is essential. It protects your nail health and creates a strong foundation for your design. When choosing a base color, guarantee it complements your overall color coordination plan. Start by cleaning your nails thoroughly and gently pushing back cuticles. Apply a thin layer of base coat, covering the entire nail surface evenly. Avoid thick coats, which can cause bubbling or uneven application. Allow it to dry completely before proceeding. Remember, a well-applied base coat enhances adhesion, prevents staining, and ensures your colors blend seamlessly. Proper preparation now makes the sponge technique easier and results more professional. Taking these steps helps you achieve beautiful, durable ombre nails with ideal nail health. Additionally, using a base coat with color accuracy properties can improve how your polish appears and lasts. Ensuring your base coat contains UV protection can also help prevent discoloration and damage over time. Maintaining the cleanliness of your tools and workspace can further prevent contamination and ensure a flawless finish. Being aware of skincare ingredient safety standards can also contribute to healthier nails and overall skin health.
Selecting and Preparing Your Sponge

Since the right sponge can make or break your ombre nails, it’s vital to choose one suited for your design. Look for a sponge with a soft, porous material—latex or makeup sponges work well because they absorb excess polish and help with seamless color blending. Make sure the sponge is clean before use; any residue or dust can disrupt the smooth gradient. You might want to cut the sponge into smaller pieces to target specific areas and achieve precision. Test the sponge with a small amount of polish to see how it picks up and releases color. A quality sponge will help you create a flawless gradient by allowing for even application and smooth color blending, making your ombre nails look professional and polished.
Dabbing on the Ombre Colors
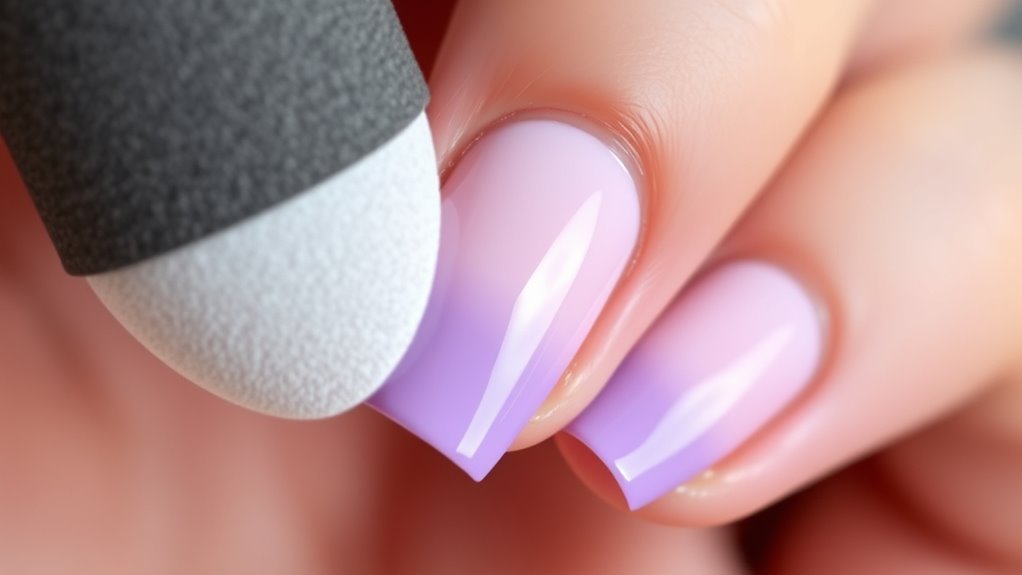
Once your sponge is prepared, gently dab the ombre colors onto your nails, working from the tip downward or from light to dark shades. Focus on creating a smooth gradient by applying even pressure and avoiding excess product. Pay attention to your color combinations, choosing shades that blend well together for a natural ombre effect. Use different sponge textures—firm or soft—to see which gives the best pigment transfer. Here are some tips:
- Lightly tap the sponge for a subtle transition
- Use a clean corner of the sponge for precise color placement
- Layer multiple dabs for intensity
- Vary pressure to control pigment absorption
- Keep the sponge slightly damp for smoother application
Additionally, choosing the right ombre sponge can significantly improve the ease and quality of your gradient. Selecting a sponge with the appropriate material composition can help achieve a more seamless blend and reduce excess product buildup, ensuring a vibrant, seamless ombre finish. Using a quality sponge designed specifically for nail art can also make a noticeable difference in your results, especially when working with different sponges that are made for various techniques.
Blending the Gradient for a Seamless Transition

After applying the initial ombre colors, the next essential step is blending the gradient to achieve a seamless shift. To do this, gently dab a clean sponge over the transition area using sponge techniques designed for smooth color blending. Light, repetitive taps help soften harsh lines and create a natural gradient. Make sure to press lightly so you don’t disturb the underlying layers. If you notice any uneven spots, lightly reapply the sponge with a small amount of polish to even out the colors. The key is patience—slow, controlled dabbing results in a flawless ombre effect. Remember, proper color blending is what truly elevates your nails from simple to stunning. Additionally, being aware of the security measures involved in online nail tutorials can help you protect your creative work from unauthorized use. Using high-quality tools can also improve the blending process and overall finish. Incorporating proper technique ensures a smoother application and more professional-looking gradient. Take your time, and your gradient will look seamless and beautifully blended.
Cleaning Up and Finishing Touches

To achieve a polished look, it’s important to clean up any excess polish or mistakes around your nails. Use a small, angled brush dipped in nail polish removal to carefully tidy the edges and perfect the shape. Employ gentle brush techniques to avoid smudging your ombre design. When cleaning the cuticle area, work slowly and precisely for a neat finish. After cleaning, apply a clear top coat to seal the design and add shine. For a flawless look, consider the following steps:
For a flawless finish, clean around nails with a small brush and seal with a clear top coat.
- Use a clean brush for precise nail polish removal
- Carefully trim any uneven edges
- Apply a quick-dry top coat to smooth out imperfections
- Remove any stray polish around the nails
- Double-check for even blending of colors
These finishing touches ensure your ombre nails look professional and long-lasting.
Tips for Maintaining Your Ombre Nails

Maintaining your ombre nails requires consistent care to keep them looking fresh and vibrant. To preserve nail health, avoid harsh chemicals and always wear gloves when doing chores. Keep your nails hydrated by applying cuticle oil daily, which also helps maintain a long-lasting shine. Regularly apply a clear top coat to protect your design and extend its lifespan. Be gentle when using your nails and avoid biting or picking at them. Limit exposure to water, as excessive moisture can weaken your nails and cause polish to chip. Proper maintenance not only enhances nail health but also ensures your ombre nails stay glossy and beautiful longer. When you follow these tips, you’ll enjoy stunning, long-lasting nails that look professionally done every time.
Frequently Asked Questions
How Long Does an Ombre Sponge Manicure Typically Last?
An ombre sponge manicure usually lasts about one to two weeks, depending on your nail health and daily activities. To maximize nail longevity, follow maintenance tips like applying a top coat every few days and avoiding harsh chemicals. Proper care helps your ombre nails stay fresh longer, so you’ll enjoy the beautiful gradient look without frequent touch-ups. With good upkeep, your manicure can look stunning for the entire duration.
Can I Use Household Items Instead of Professional Sponges?
You can definitely use household substitutes instead of professional sponges for your ombre nails. DIY sponge tips like makeup sponges, kitchen sponges, or even sponge brushes work well. Just make sure to cut or tear them into small, flat pieces for better control and blending. Dabbing gently helps create a smooth gradient. Remember, the key is to use a soft, porous sponge to achieve a seamless ombre effect.
What Are Common Mistakes to Avoid During the Ombre Sponge Technique?
Imagine you’re trying to achieve perfect color blending on your nails, but you press too hard with the sponge, causing uneven lines and harsh shifts. To avoid this, use gentle sponge pressure, blending colors softly for a smooth ombre effect. A common mistake is overloading the sponge with polish, so dab lightly and build up color gradually. This ensures a seamless gradient and professional-looking nails every time.
How Do I Fix Uneven or Patchy Ombre Nails?
If your ombre nails turn out uneven or patchy, you can fix them by applying more blending techniques with a clean sponge to smooth out the progressions. For color correction, gently add a tiny amount of the base or top color to even out patches. Always let each layer dry fully before adding more, and don’t hesitate to reblend for a seamless fade. Practice makes perfect!
Are There Specific Topcoats Recommended for Ombre Nail Designs?
When choosing a topcoat for ombre nail designs, focus on topcoat selection that enhances nail durability and provides a smooth finish. A gel or high-quality clear topcoat works best to seal in your design and prevent chipping. Look for a formula that offers shine and long-lasting protection, ensuring your ombre nails stay vibrant and intact longer. Proper topcoat application is key to a flawless, durable ombre look.
Conclusion
Now that you’ve mastered the sponge technique, your nails will look as stunning as a Renaissance masterpiece. Remember to seal in your design with a top coat and keep them moisturized, just like a proper Victorian lady. With patience and practice, you’ll be turning heads no matter the occasion. So go ahead, experiment with colors, and make your nails your personal Mona Lisa—because beauty, like art, is all about the details.